Remote Desktop
This page describes how to enable Remote Desktop on ABCI with VNC (Virtual Network Computing). By using Remote Desktop, you can use the GUI on compute nodes.
Preparation
- Login to the interactive node, and launch
vncserverfor initial settings
[username@es1 ~]$ vncserver
You will require a password to access your desktops.

Password:
Verify:
Would you like to enter a view-only password (y/n)? n

New 'es1.abci.local:1 (username)' desktop is es1.abci.local:1

Creating default startup script /home/username/.vnc/xstartup
Creating default config /home/username/.vnc/config
Starting applications specified in /home/username/.vnc/xstartup
Log file is /home/username/.vnc/es4.abci.local:1.log
- Stop VNC server
[username@es1 ~]$ vncserver -kill :1
- Edit some configuration files
$HOME/.vnc/xstartup:
#!/bin/sh

unset SESSION_MANAGER
unset DBUS_SESSION_BUS_ADDRESS
#exec /etc/X11/xinit/xinitrc

xrdb $HOME/.Xresources

startxfce4 &
You can change screen size to edit $HOME/.vnc/config if needed.
geometry=2000x1200
- Login to ABCI
[user@localmachine]$ ssh -J %r@as.abci.ai username@es
- Login to a compute node which is assigned by AGE with ABCI On-demand service and resource type rt_F.
[username@es1 ~]$ qrsh -g grpname -l rt_F=1 -l h_rt=1:00:00
- Launch
vncserver
[username@g0001 ~]$ vncserver

New 'g0001.abci.local:1 (username)' desktop is g0001.abci.local:1

Starting applications specified in /home/username/.vnc/xstartup
Log file is /home/username/.vnc/g0001.abci.local:1.log

[username@g0001 ~]$
g0001.abci.local:1 is the display name of the VNC server you launched. Port 5901 is assinged to the connection to this server. In general, you can connect to the VNC server using a port with the display number plus 5900. For example, port 5902 for :2, port 5903 for :3, and so on.
Start VNC
The following part explains how to start VNC separately for macOS and Windows.
Using an SSH Client
Your computer most likely has an SSH client installed by default. If your computer is a UNIX-like system such as Linux and macOS, or Windows 10 version 1803 (April 2018 Update) or later, it should have an SSH client. You can also check for an SSH client, just by typing ssh at the command line.
Create an SSH tunnel
To connect to the VNC server by using Port 5901 of your computer, you need to create an SSH tunnel between localhost:5901 and g0001.abci.local:5901.
If you have OpenSSH 7.3 or later, you can create an SSH tunnel with the following command:
[user@localmachine]$ ssh -N -L 5901:g0001.abci.local:5901 -J %r@as.abci.ai username@es
If you cannot use ProxyJump, you can also create one with the following command:
[user@localmachine]$ ssh -L 10022:es:22 -l username as.abci.ai
[user@localmachine]$ ssh -p 10022 -N -L 5901:g0001.abci.local:5901 -l username localhost
Launch VNC client
In macOS, VNC client is integrated in Finder. So, you can connect to the VNC server by the following command:
[user@localmachine]$ open vnc://localhost:5901/
If not using macOS, you need to install a VNC client separately and configure it to connect to the VNC server.
PuTTY
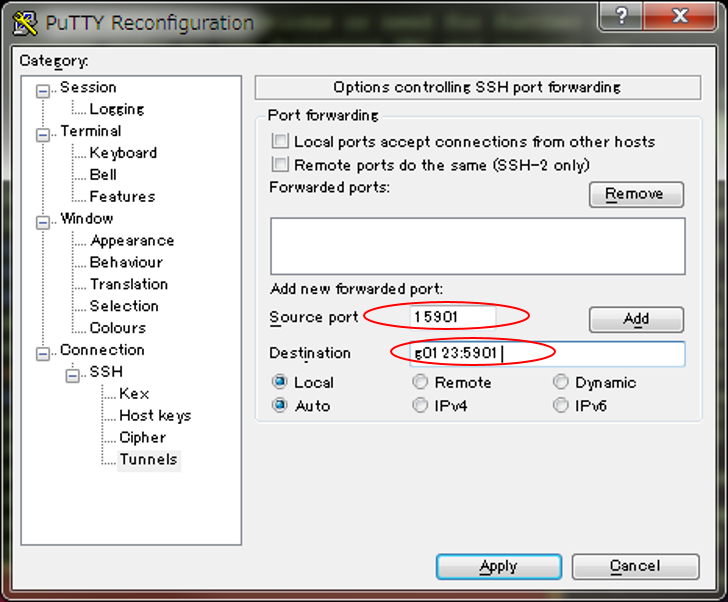
First, configure an SSH tunnel.
Click [Change Settings...] and click [SSH] - [Tunnels].
| item | value |
|---|---|
| sample image |  |
| local port | port number which you can use on your system. ex) 15901 |
| remote host:port | hostname of compute node and port number of VNC server ex) g0123:5901) |
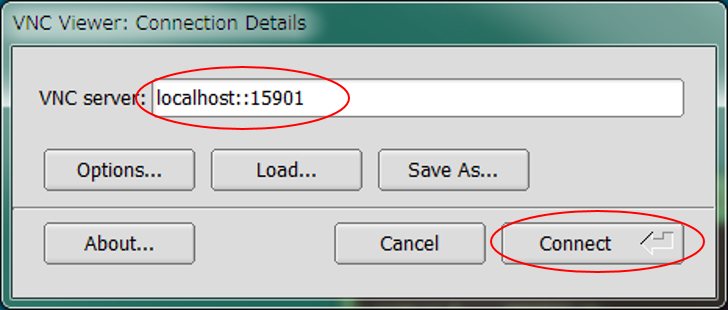
Launch VNC client and connect to localhost and the port number which assigned by SSH port forwarding. In the example of Tiger VNC client, hostname and port number are connected by "::".

Click [Accept] , enter your VNC password, then launch VNC viewer.
Stop VNC
- stop VNC service and exit compute node.
[username@g0001 ~]$ vncserver -list

TigerVNC server sessions:

X DISPLAY #     PROCESS ID
:1              5081

[username@g0001 ~]$ vncserver -kill :1
Killing Xvnc process ID XXXXXX
[username@g0001 ~]$ exit
[username@es1 ~]$